 how-to
Small Bathroom Remodel Space Saving: 7 Steps That Work
Table of Contents
- Start With a Floor Plan Audit Before You Buy Anything
- Best Space Saving Bathroom Fixtures for Tight Layouts
- Small Bathroom Storage Ideas That Use Vertical Space
- Wet Room and Walk-In Shower Conversions
- Small Bathroom Remodel Cost Breakdown and DIY vs. Pro Decisions
- Lighting, Tiling, and Visual Expansion Tricks
- Conclusion
- Frequently Asked Questions
Last Updated: September 14, 2026
Start With a Floor Plan Audit Before You Buy Anything
Most small bathroom remodel space saving projects fail at the register, not the job site. Homeowners buy a vanity or shower door that looks right in the showroom, then discover it blocks the door swing or crowds the toilet. The fixture was never the problem, the plan was.
A floor plan audit is a measured survey of your bathroom's existing layout that records every fixture, wall, door, and drain location before any purchase. It takes about an hour with a tape measure and graph paper, and it prevents the most expensive mistake in a small bathroom remodel.
Measure Fixture Clearance and Door Swing
Clearance is the distance between a fixture and anything it needs to function. For a toilet, you want roughly 15 inches of clear space on each side and about 21 inches in front; for a sink, at least 30 inches of width (codes.iccsafe.org).
Door swing is the detail most people skip. A 30-inch door swinging inward eats a quarter of a small bathroom's floor plan, so measure the arc and mark it on your drawing.
Write down the location of your toilet drain and sink supply lines. Moving a drain is the most expensive change in a bathroom remodel, so build the plan around what's already there.
Best Space Saving Bathroom Fixtures for Tight Layouts
The best space-saving fixtures trade depth for height. Wall-mounted toilets, floating vanities, and corner sinks pull the footprint off the floor, but what you can install is decided by what's inside your wall, not the showroom.
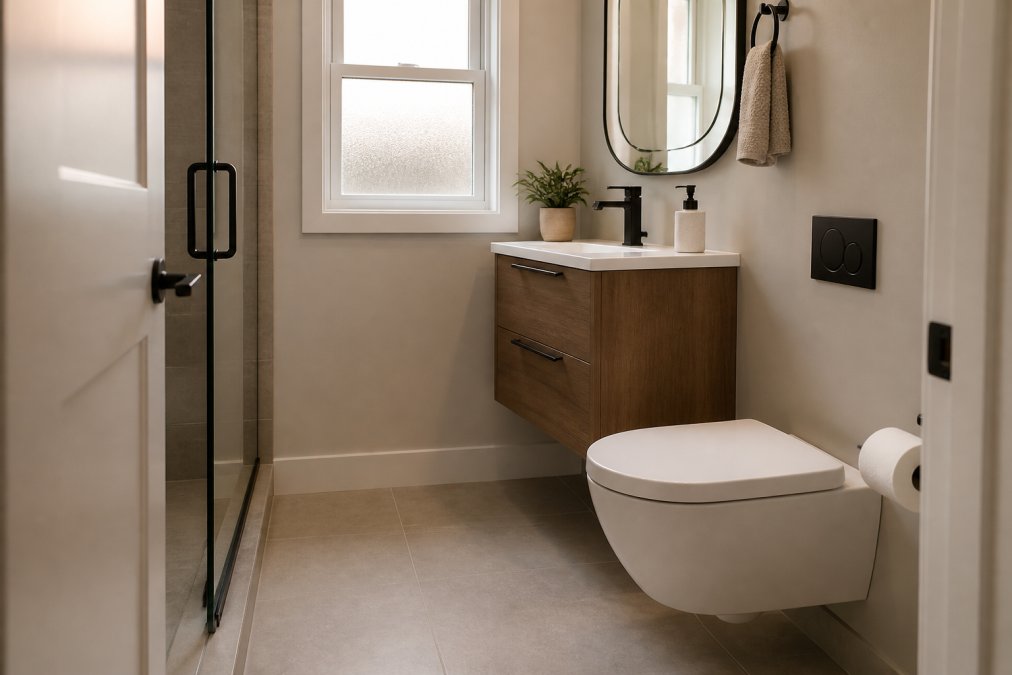
Wall-Mounted Toilets and In-Wall Tanks
A wall-mounted toilet hides the tank inside the wall, freeing roughly 9 to 12 inches of depth versus a standard two-piece toilet. The tradeoff: the carrier frame and in-wall tank must be installed during rough-in. You cannot retrofit one later without opening the wall.
This is a construction decision, not a cosmetic one. The carrier bolts to the studs and the drain reroutes into the wall cavity. A shared wall with a closet or hallway may have room; an exterior brick face probably doesn't.
The carrier frame is structural and must fasten to framing that can carry the load. A typical in-wall carrier is rated for roughly 500 pounds when properly anchored, but that assumes solid blocking or doubled studs (2024 Uniform Plumbing Code). On furring strips over masonry or a thin partition wall, the carrier has nowhere to grab, at which point a wall-mounted toilet becomes a framing project.
The drain reroute is the second constraint. A standard toilet drain runs down through the floor; a wall-mounted toilet drain runs horizontally into the wall and ties into the stack, so it needs slope and a vent. If the stack is in the corner behind the toilet, convenient. If it's on the opposite wall, you're opening the floor and wall, the difference between a weekend project and a permit-level remodel.
Floating Vanities, Corner Sinks, and Pedestal Options
A floating vanity mounts to the wall and leaves the floor visible, the cheapest way to make a small room read as larger. Standard vanity depth is 21 inches; a shallow floating vanity at 18 inches buys back three inches of walking room. A corner sink fits a dead corner no rectangular vanity can use. A pedestal sink is the most compact option but offers zero storage, so it only works with a mirror cabinet or wall shelving nearby.
A floating vanity is not a cabinet sitting on a cleat, it's bolted to blocking that must be in the wall before drywall goes up. If the wall is open, add 2x6 or 2x8 blocking between studs at the vanity rail height. If it's closed, you're opening it or using a French cleat rated for the loaded weight. A 36-inch floating vanity with a stone top and full drawer can weigh 150 pounds or more empty; add water, toiletries, and towels and you're asking a lot of two lag bolts.
Corner sinks solve a geometry problem, not a storage problem. They fit where a rectangular vanity cannot, but the drain and supply lines still have to reach the corner, and in many small bathrooms the plumbing is centered on the wall, meaning you move the rough-in. A corner sink works when the plumbing is already in the corner or you're willing to pay to move it.
Pedestal sinks are the most compact and least useful. They free the most floor space and cost the least, but give you nowhere to put a toothbrush. They work in powder rooms where the only job is washing hands. In a full bathroom, you'll add a wall cabinet or shelf to compensate, eating back some of the space you gained.
| Fixture | Floor Space Freed | Storage | Rough-In Impact | Best For |
|---|---|---|---|---|
| Wall-mounted toilet | High | None | High, carrier and drain reroute | Narrow layouts with open walls |
| Floating vanity | Medium | Moderate | Low to medium, blocking required | Most small bathrooms |
| Corner sink | Medium | None | Medium, plumbing must reach corner | Awkward corners with existing plumbing |
| Pedestal sink | High | None | Low, standard rough-in | Powder rooms |
What the Code Says About These Fixtures
Building codes don't name specific fixtures, but they govern the clearances and plumbing that make them legal. The International Residential Code, adopted by most states, sets minimum fixture clearances: 15 inches from the toilet centerline to any side wall or obstruction, 21 inches of clear space in front of the toilet, and 30 inches of width for a lavatory. A wall-mounted toilet or corner sink doesn't exempt you. If the fixture fits the wall but not the clearance, the inspector won't pass it.
Venting is the other code issue. Every fixture drain needs a vent, and a wall-mounted toilet drain that reroutes horizontally still needs to connect to a vented stack. In a small bathroom the vent is often shared with the sink, which is fine if drain sizes and the vent connection are correct. Moving the toilet to a wall with no vent means adding one, a permit-level change in most jurisdictions.
Electrical is the third constraint. A floating vanity with a lighted mirror or drawer outlet needs a GFCI-protected circuit, and the outlet must sit outside the sink's splash zone. The National Electrical Code requires GFCI protection for bathroom receptacles and restricts outlet placement relative to the sink. Confirm the location against code before you cut drywall.
The takeaway: pick the fixture that fits your framing, drain location, and vent, then confirm the clearance numbers. Aesthetics come after the wall is open and the measurements are real.
Small Bathroom Storage Ideas That Use Vertical Space
When the floor plan is maxed out, the wall is the only direction left. Vertical storage is the highest-yield change in a small bathroom remodel: it costs little and adds capacity without touching the plumbing.
Recessed Storage and Mirror Cabinets
A recessed medicine cabinet sits inside the wall cavity between studs, adding depth without stealing floor space. A mirror cabinet does double duty: mirror plus hidden toiletries. Open shelving above the toilet handles towels and decor without closing in the room.
Keep shelves narrow, no more than 10 to 12 inches deep, so they don't become head-bumpers over the toilet.
Wet Room and Walk-In Shower Conversions
A wet room is a fully waterproofed bathroom where the shower area is open to the rest of the room, with no curb and no enclosure. Converting a tub-and-shower combo into a walk-in shower or wet room is the single biggest space gain in a small bathroom remodel, eliminating the tub footprint and door swing at once.
Construction matters more than design here. A wet room requires full waterproofing under the tile, a sloped floor toward the drain, and a linear or center drain. A glass partition can replace a shower door, removing the swing entirely.
Sliding and pocket doors solve the same swing problem at the entry. A pocket door slides into the wall and gives back the full arc a swinging door would occupy.
Small Bathroom Remodel Cost Breakdown and DIY vs. Pro Decisions
The honest answer on small bathroom remodel cost breakdown is that scope drives price far more than square footage. A cosmetic refresh costs a fraction of a full gut remodel that moves plumbing and reroutes drains. Here's the project segmented by budget tier and by who does the work.
Three Budget Tiers, Three Different Projects
Think of a small bathroom remodel as one of three projects, not one project at three price points.
Tier 1, Cosmetic refresh. You keep the layout, plumbing, and fixtures in place. You paint, replace the mirror, swap the faucet, regrout or recaulk, and add storage. DIY makes the most sense here because nothing is behind a wall or under a floor. The work is reversible, the risk is low, and a homeowner with basic tools can do most of it over a few weekends.
Tier 2, Fixture and finish replacement. You keep the rough-in but replace the vanity, toilet, shower valve, tile, and lighting. The DIY-versus-pro line blurs here. Swapping a toilet on an existing flange is DIY. Replacing a shower valve means opening the wall and soldering or crimping new supply lines, a pro job in most households. Tiling is the gray zone: a homeowner can lay tile, but bad waterproofing behind it is invisible until it fails, and by then you're replacing subfloor.
Tier 3, Layout change. You move the toilet, sink, or shower, which means moving the drain and supply lines. The budget climbs fastest here and permits are almost always required. A drain move means cutting the floor, rerouting pipe with correct slope, and reconnecting to the stack; a supply line move means opening the wall. This is pro territory, and where the difference between a $15,000 and $30,000 project lives.
| Tier | What Changes | Typical DIY Share | Permit Likely? |
|---|---|---|---|
| Cosmetic refresh | Paint, mirror, faucet, storage | High | No |
| Fixture and finish | Vanity, toilet, tile, lighting | Mixed | Sometimes (electrical, plumbing) |
| Layout change | Drain, supply, walls | Low | Yes |
What Actually Drives the Price
Square footage is a weak predictor. The cost drivers, in rough order of impact:
- Moving the drain. The single most expensive line item in a small bathroom. It requires cutting the floor, rerouting pipe, and often adding a vent.
- Moving the supply lines. Cheaper than the drain but still a wall-opening job.
- Waterproofing a wet room or walk-in shower. Membrane, slope, and drain work are labor-heavy and unforgiving.
- Electrical. New circuits, GFCI protection, and lighting near water require a licensed electrician in most jurisdictions.
- Tile. Large-format tile is faster to install but harder to cut; small tile is slower. Labor is the cost, not the material.
- Permits and inspections. The fee is small; the schedule impact is not.
A common pattern: homeowners budget for fixtures and forget the rough-in. The fixture is the visible cost; the rough-in is the invisible one, and usually larger.
Building Code and Plumbing Constraints
Building codes govern venting, drain sizing, electrical outlets near water, and fixture clearances. A permit is often required when you move plumbing or add electrical. Skipping it can stall a future home sale when an inspector finds unpermitted work.
The plumbing rough-in decides most layouts. Your toilet drain and sink supply lines are fixed unless you pay to move them. Design around the rough-in and the project stays affordable; fight it and the budget climbs fast.
Three code points come up again and again in small bathrooms:
- Venting. Every fixture drain needs a vent. Moving a toilet to a wall with no vent means adding one, a permit-level change.
- GFCI protection. The National Electrical Code requires GFCI protection for bathroom receptacles. An outlet for a lighted mirror or vanity drawer must be on a GFCI-protected circuit.
- Clearances. The International Residential Code sets minimum clearances for toilets and lavatories. A fixture that fits the wall but not the clearance won't pass inspection.
The DIY vs. Pro Decision, Made Concrete
How to sort the work:
- DIY-friendly: paint, swapping a faucet, installing open shelving, replacing a mirror, regrouting tile, swapping a toilet on an existing flange.
- Pro territory: moving a drain, installing an in-wall toilet carrier, waterproofing a wet room, electrical work near water, adding a vent, anything requiring a permit.
- The gray zone: tiling and vanity installation. A homeowner can do both, but the failure modes are hidden, a floating vanity that pulls out of the wall because the blocking was wrong is a repair you don't want.
A practical rule: if the work is behind a wall, under a floor, or connected to a permit, hire it out. If it's surface-level and reversible, DIY it. That line keeps the budget honest and the inspection clean.
For a firm quote on your specific layout, the U.S. Department of Housing and Urban Development's homeowner resources and your local building department are the right starting points for permit questions.
Lighting, Tiling, and Visual Expansion Tricks
Visual expansion uses light, color, and pattern to make a small room read as larger than its square footage. It won't add an inch, but it changes how the room feels every day.
Ambient lighting does the heavy lifting. A single overhead fixture casts shadows that shrink a room. Layered lighting, an overhead plus vanity lights plus a small accent, flattens the space and makes it feel open. Natural light from a window or a light tube helps most of all.
Tiling patterns matter too. Large-format tiles with fewer grout lines make a floor look bigger. Running tile vertically on a shower wall adds perceived height. Light colors reflect more light, which is why most small bathrooms lean toward white and pale gray.
A glass partition instead of a shower curtain keeps sightlines open. A large mirror bounces light and doubles perceived depth. Keep the palette to two or three materials and let the space breathe.
Conclusion
A small bathroom remodel space saving plan comes down to three moves: audit the floor plan before you buy, pull fixtures off the floor, and respect the plumbing rough-in. Get those right and the room works. Get them wrong and you're returning a vanity.
Cole Home Service & Landscape Construction has spent over 25 years helping homeowners in Orange and Los Angeles Counties navigate exactly these decisions, from layout planning to finish selection. We offer custom work, honest guidance for clients without existing designs, and reliable communication by text throughout the project. No job is too small.
Get a free quote from Cole Home Service & Landscape Construction and turn your cramped bathroom into a space that actually works.
Frequently Asked Questions
What are some ways to save space in a small bathroom?
Swap bulky fixtures for wall-mounted versions: a floating vanity, a wall-mounted toilet with an in-wall tank, and a corner sink all free up floor area. Add recessed storage between studs instead of a bulky cabinet. Replace a swinging door with a pocket or sliding door. Use vertical shelving above the toilet. These changes reduce the fixture footprint without shrinking storage capacity, and they make the room feel larger during daily use.
What are the best space-saving fixtures for tiny bathrooms?
Wall-mounted toilets with in-wall tanks eliminate the floor-mounted base and save roughly 9 to 12 inches of depth. Floating vanities open the floor underneath and make the room read larger. Corner sinks and pedestal sinks work in powder rooms where a full vanity won't fit. A curbless walk-in shower with a glass partition replaces a tub and reclaims usable floor area. Each fixture choice should match your plumbing rough-in before you buy.
What does a small bathroom remodel cost breakdown look like?
Costs depend on scope, materials, and whether you hire a pro or do it yourself. Labor, fixtures, tile, plumbing modifications, and permits are the main line items. Moving a toilet or shower drain adds plumbing rough-in work. Keeping the existing layout costs less than relocating fixtures. Cole Home Service & Landscape Construction provides free quotes so you can see real numbers for your project before committing.
What are the most common mistakes to avoid in a small bathroom renovation?
Skipping the floor plan audit is the biggest one. Homeowners buy a vanity or tub before measuring fixture clearance and door swing, then discover it doesn't fit. Second: ignoring plumbing rough-in constraints, which forces expensive drain relocation. Third: choosing dark tile and heavy finishes that shrink the room visually. Fourth: forgetting maintenance access for in-wall tanks and recessed storage. Plan the layout, verify code requirements, and pick light finishes before you buy anything.